

how to draw a wolf how to draw a wolf step by step
Wolves are magnificent creatures that symbolize loyalty, spirit, trust, and guardianship. The ability of the wolf to make strong emotional bonds and its sense of intuition are qualities that we as humans tin can learn too – how to trust both our hearts and instincts in guild to lead a fulfilling life. If you would like to acquire how to draw this beautiful and fearless creature, expect no further than this simple tutorial on how to draw a wolf, footstep by stride, with concept creative person IzzyBll. Follow along as we testify yous how to achieve the correct proportions, perspectives, and finishing touches for creating a realistic cartoon of a wolf face. This tutorial can be completed either by drawing past paw on newspaper or with a graphics tablet.
Tabular array of Content
- i Necessary Wolf Drawing Materials
- ii How to Draw a Wolf Head Stride past Step
- 2.1 Step 1: Sketching the Caput Shape
- 2.two Step 2: Add together the First Construction Lines
- two.iii Step iii: Additional Construction Lines
- two.4 Stride 4: Listen Up
- 2.five Step v: Outlining the Snout / Nose
- ii.6 Stride 6: Shaping the Facial Characteristics
- 2.7 Pace 7: Facial Features
- ii.viii Stride 8: Outer Fur
- 2.9 Step ix: Inner Fur
- 2.10 Step 10: Shading and Details
- 2.11 Things to Consider When Drawing a Wolf Face
- 3 Some Motivation and Tips to Make Wolf Drawing Easy
Necessary Wolf Cartoon Materials
While cartoon is past no means the only way of creating a slice of art of a wolf, it is certainly i of the easiest. Using pencil and paper is a great drawing method for beginners and those looking to explore their artistic abilities, whereas the utilize of a graphics tablet may entreatment more to those with more experience.
Those going with the traditional method of drawing on paper cannot become wrong by using thissketchbook by Bellofy. This sketchbook will provide you lot with plenty of empty pages merely waiting to exist filled with your wolf sketch likewise as many other pieces of art.
For sketching and cartoon, yous will need two to iii different pencil shades of your selection. We recommend using a calorie-free construction or drafting pencil to brainstorm with, such as this fix past Nicpro. This is platonic for your preliminary sketch lines and markings, as the lead will be easy to erase subsequently. To add together shading, effectively lines, details, and shadows, nosotros propose using this Dowswin thirty-piece pencil and charcoal sketching set.
For those using a digital platform such as a graphics tablet, you will detect that instead of a ready of pencils, you volition be working with a stylus, mouse, or drawing pen. Aim to use a standard set of brushes and ensure a balanced DPI on your mouse if you are not going to by using a stylus or graphics pen.
All yous really need is to retrieve to have fun, enjoy the tutorial, and take your time – we discover that the biggest reward to an artist working on any artwork is patience, equally this is how you tin reach perfection!
How to Describe a Wolf Head Step by Step
As with most animals, wolves are known for possessing an incredible amount of fur, which is something that can intimidate many artists. There is no need to worry, however, as this tutorial volition testify you exactly how to depict a wolf step by pace. This means that we will be breaking downwardly the wolf'south individual facial features and various elements into different steps, thus making your wolf cartoon easy to accomplish.
Stride i: Sketching the Head Shape
For our very offset step, we will need to decide where on the sail or paper nosotros want our field of study (the wolf caput) to exist. In this tutorial, nosotros take decided that the best position for our bailiwick is in the eye of the page, creating a focal signal.
With a lightly shaded pencil (or brush on a graphic tablet), describe an oval shape. This will represent our subject'due south head shape in and around which we will be working. You can also draw several blocks across the surface of your paper or canvas then every bit to assistance you place your center points, thus aiding with the perspective of your wolf drawing.
For this step, be sure to leave enough space all around the oval shape for subsquent steps, where we volition be adding more than details and fur.

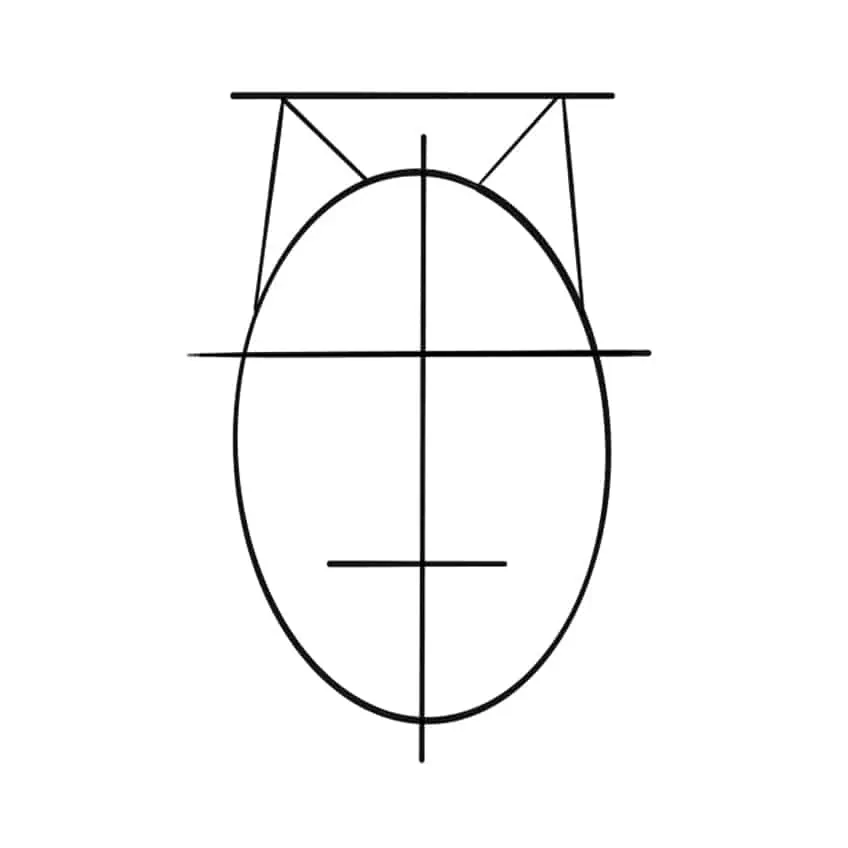
Step two: Add the First Construction Lines
Depict a centerline down the very heart of the oval shape, and another across – about one 3rd down from the top. This will help y'all identify where yous are going to accept the wolf'southward optics and eyebrows, equally well as a bones thought of where the ears and snout/nose will be centered. With this information, you will also able to find out where the rima oris will exist on your wolf sketch.
Footstep three: Boosted Construction Lines
Following the previous step, add a secondary horizontal line above the oval shape. This will aid to pinpoint the level at which nosotros will exist drawing the wolf's ears, while as well aiding in symmetry and helping the ears to reach the same point in height. Draw another horizontal line, except now half the length of the top ane, positioned about 1-third upwards from the lesser. This will aid us align the nose and rima oris.

Step 4: Mind Upwardly
Time to add together the ears! Add a pair of somewhat triangular shapes to the top of the oval, each with the tips reaching the very top horizontal line. We will be turning these simple triangles into more than realistic-looking ears presently.
Breaking downwards the oval shape into sections will make drawing a wolf face much easier.
Stride 5: Outlining the Snout / Olfactory organ
Draw an oval shape as shut to the center every bit possible, using the middle center line to assistance the symmetry. Then, add two streak lines to assist in portraying the shape of the wolf'due south snout/nose. Much like a domestic dog, the nose is a much wider feature on the face.
Step 6: Shaping the Facial Characteristics
Drawing on peak of the lighter construction lines, shape the ears to look more curved without necessarily touching the oval shape. This is because we will be adding fur to raise the look, and so you lot do not need to worry if the ears are slightly offside. Now you tin can draw the oral cavity details, making them wider than the snout with a small hint of the wolf's bottom lip as an added particular – this will help to achieve more than emphasis on this fundamental facial feature.
Step 7: Facial Features
To brainstorm detailing the facial features of your wolf sketch, you tin begin by drawing the eyes, slightly sloping inwards, towards the center of the snout/nose. On the nose, depict 2 bones squiggles for the nostrils and then use a darker pencil shade to follow the structure line of the snout/nose.

Footstep eight: Outer Fur
Equally we begin to add more than detailed characteristics, it is best to start by adding fur to the outer layers of our wolf drawing. Follow the oval structure lines that brand up the shape of your wolf's face and begin drawing in the fur, 1 side of the oval at a time. Remember, a wolf's fur is always spreading outwards, and this includes about of the wolf's inner fur every bit well. The only fourth dimension the fur will not catamenia outwards is at its "connecting points", such as at the bottom of the neck, where the fur joins together and flows as 1, similar to a flame.
This blazon of fur is frequently referred to as a winter coat due to the puffy-looking style, which is exactly what we want for our Wolf. To achieve this, simply draw the hirsuite outline slightly wider than the bodily oval shape you lot drew with the construction pencil.

Step 9: Inner Fur
Using the construction lines of the ears, draw modest, detailed streaks of the wolf's inner fur. Retrieve to point the inner fur outwards in a similar manner to that of the outer fur; the main difference is that the inner fur will require smaller streaks, indicating shorter and thinner bits of hair.
Using the center confront line, create ii inner fur lines on either side, which volition somewhat resemble eyebrows, effectually the eyes. Carry this line farther and bend information technology along the construction lines of the oval face up. If you are cartoon a wolf face from the front, nosotros recommend adding in smaller inner fur patches all along the face in lodge to create more than of a three-dimensional look.

Step 10: Shading and Details
In this step, we will add a darker impact to the outer fur, especially on the top of the head and the ears. We volition also be adding a darker shade to the eyes, the snout/nose, and the bend of the mouth, as these are the primal facial elements of a wolf. As these are the characteristics that brand a wolf recognizable, information technology makes sense for us to emphasize these details by darkening them.
After this footstep, we simply "make full in" the inner fur with strokes until we attain the outer fur. Here, it is crucial to remember that you demand to utilize both the horizontal and vertical heart lines to help guide your fur direction outwards, as this will allow it to look symmetrical whilst giving the effect of a current of air blowing towards the wolf's face.
You tin can now erase the construction lines and add a second and third layer of fur strokes, starting with the top of the head and decreasing the hardness and amount of fur strokes as yous go down towards the cervix, giving you lot a fading outcome.
 As mentioned higher up, it is of import to darken key facial features in order to brand them stand up out, as this is what will allow for instant recognition when someone views your drawing – cool wolf! To create more realism in your wolf cartoon, be sure to add fine lines, details, and shadows around the eyes, snout/nose, jawline, and outer fur of your wolf face.
Things to Consider When Drawing a Wolf Confront
- Brainstorm with a simple oval shape and break down the wolf'south facial features into carve up parts.
- The wolf's cardinal facial characteristics are important to emphasize.
- A wolf's outer and inner fur will always spread outwards.
- Some minimal shading can brand a big difference; endeavour repeating and doing it slowly for a more than realistic expect.

Some Motivation and Tips to Make Wolf Drawing Easy
- Remember that drawing is not something you can instantly excel at without any practise. Any difficult work, practice, fourth dimension, and try yous put in will pay off on every artwork you work on. Not every artwork y'all make will be skilful, but your experience will grow.
- Fine art may have skill, just it also takes guidance. Thus, following a tutorial such as how to draw a wolf head can help you build your skill.
- Choose a workspace in which you experience artistic and tin express yourself! Ensure that information technology is neat and orderly whilst still being a spot of inspiration and inventiveness.
- If yous are a traditional artist, know your pencils. Your pencils are your principal tool when drawing, and the use of different pencil shades and thicknesses tin can change an artwork.
- Try drawing things y'all find challenging.Invest in an advanced online drawing grade or do your ain research on different techniques and endeavour them out.
- Learn as much equally you can about blending and color theory to permit for unlimited possibilities in your colour shades combinations.
- To practice, begin by drawing from references or objects in forepart of y'all, as ascertainment is what aids your realism, proportional scales, and perspectives when drawing.
- Try using different textures, materials, mediums, and platforms. Switch from traditional drawing to digital art – you might love it or even exist able to enhance your skill more with digital software.
- Build your own style while developing your skill. The more you explore different techniques, styles, and mediums, the closer you lot will get to discovering your ain unique art fashion!
And finally, never terminate practicing!

Source: https://craft-art.com/how-to-draw-a-wolf-head-and-face/
Posted by: williamsblithad.blogspot.com
0 Response to "how to draw a wolf how to draw a wolf step by step"
Post a Comment