

How To Draw Arms Coming Towards You
In this tutorial I'll show the process that has helped me to describe hands accurately from imagination. It'due south also a corking process if y'all're drawing from reference.
Keep in listen, fifty-fifty though the process itself is quite simple, drawing hands is never going to exist easy. There's prerequisites that go far challenging, like beefcake, perspective and shading. If y'all want to describe simple easily, rather than learn a unproblematic process to draw real hands, I besides have a lesson on drawing Cartoon Hands. But all this stuff ties together, then let's get started…
The Idea
The outset step is to get a clear idea of the hand you're gonna describe. Don't jump in blindly and showtime drawing. Effigy out the bending we're looking at the mitt from. Tin nosotros encounter the back of the hand or the palm? How much of the forepart are nosotros seeing? Or are we looking at it from the back? What is each finger and thumb doing? What about the wrist?
Imagine this clearly in your listen before you brand a marking. And you always have your own mitt that you tin can use to effigy it out.
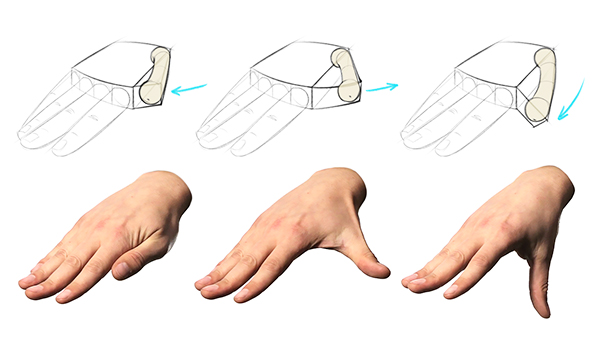
And don't draw boring hands. Button the gesture. Button the story of the pose. If the activeness is the fingers spreading, think nigh what happens when you spread them farther. When I try to spread my fingers as far as I can, my wrist flexes a fiddling and my fingers bend dorsum. That makes the pose a bit more interesting.
Hands are extremely expressive. When yous're cartoon hands you accept to be an thespian. Just like when you're drawing facial expressions. You gotta feel the expression of the hand pose you're cartoon.
Once the idea is clear, nosotros'llshowtime constructing the hands using elementary forms. I'm gonna say it a lot in this lesson… information technology's important to pace back and think about thesimple forms. The complicated collection of bone, muscle, tendon, fat, and skin of thepalm becomes a unproblematic box. The wrist is a narrower box, which bends at the carpals. Thefingers become cylinders or boxes. With the mitt simplified like this, it becomes much more manageable to pose, add anatomy, and to shade it.
The Palm
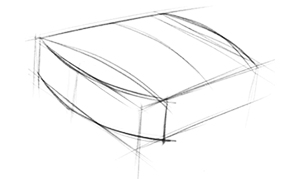
I mentioned that the palm areas tin can be simplified to a boxy grade with equal pinnacle and width. That'southward a good place to beginning, but if you want to be a little more than precise, it's adept to start thinking about the nuances. Notice that the bones on the pinky side are slightly shorter. So, we should curve that front aeroplane. The middle finger area should exist longest. Afterward on we'll add the muscular tear drops on both sides. For at present, let's ignore the muscle masses and just go along the palm equally a simple concave box.
We're looking at this box from the height. We tin see the right side and the front end airplane of the knuckles. This is the sort of thing you need to figure out early in the drawing – the proportion and perspective of all the elementary forms. This applies no thing what yous're drawing. Until y'all've figured out all the basic information, you shouldn't describe whatsoever details. It will be harder to detect and correct mistakes once you have details like fingernails, creases, and shadows crowding the drawing. Non to mention, all your wasted time and endeavour!
Let'southward rewind. Before we add the fingers, permit'ssplit that front end plane into four parts. That mode nosotros know where each finger extrudes from. Don't forget about the foreshortening!
If yous tin can do that, you have a really good starting point and you're on your fashion to drawing an awesome hand.
The Fingers
At this point you can start extruding the finger segments, but it helps me to start with some kind of gestural or wireframe guideline. I'm gonna give yous 3 options that you can choose from. Everyone has their preferences and different poses might phone call for different approaches.
If the fingers are grouped together, yous can try to imagine a mitten shape for all of them. If one or more of the fingers is separate from the group, depict information technology separate. Grouping the ones that you can and decide if they're bending.
Another way is to throw down some lines and dots for the knuckles. This can help figure out the position and length of each segment with minimal lines that are easy to adjust.
The third pick is to draw the gesture of each finger. Don't worry virtually separating each phalanx. Ignore the joints and just place the motion of each finger. Do this very lightly.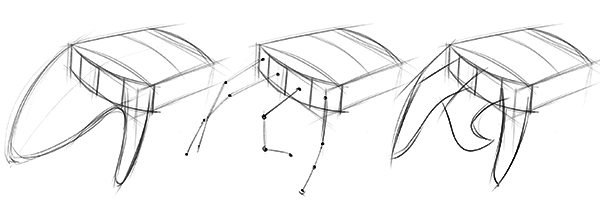
Equally I said, different poses will phone call for different approaches or combination of them. And, everyone has their preferences. Try them out and see what you lot like.
A adept tip is tooutset with the pinky and index finger. Information technology's easy to effigy out the middle 2 once y'all get the pinky and index. They're either distributed evenly between or grouped in some way. Personally I similar to look for ways to grouping some fingers together, unless the expression in stronger without grouping, like in this case. Which fingers to group together is upwardly to you. Whatsoever results in the best expression.
Ok, now let'southwardadd together some structure to the fingers. Usually I similar to use cylinders for each segment. Cylinder considering they're easier and quicker than boxes. And information technology's pretty easy to plough a cylinder into a box afterwards, if I desire to point the rotation of that cylinder. An indication of the box at the joint is plenty.
There's 12 segments in the fingers, and that doesn't fifty-fifty include the thumb. That'southward a lot of cylinders and boxes to think about.It's tempting to rush through them, merely fight the feeling of urgency. Get them in the right spot, with the right proportions and perspective. As you're working and correcting your mistakes, you might notice that your line are getting darker and darker and darker… This makes it hard to piece of work on details later. Practise your all-time tocontinue your lines light and clean throughout the construction process. Don't scribble and create a mess. Think through the drawing.

The Pollex
In the manus basic lesson, we learned most the triangular box for the base of the thumb.
Acquire more about drawing the bones of the hand in this tutorial:
This triangular box tin can be stretched, squished, and rotated depending on the position of the thumb's metacarpal. Wait at your pollex and see all the different ways it can movement. Sometimes I imagine the metacarpal os to make sure it'southward position is believable and the length relates correctly with the others. The gap betwixt the thumb and palm is filled with musculus and skin in a triangular shape. Thus, the triangular box. Or only a long gesture through the bones so an indication of the skin between the knuckles. Upwards to you.
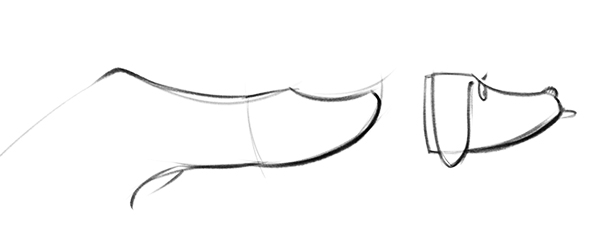
From that triangular box, extend a cylinder for the offset phalanx. And then a triangular scooped wedge shape for the end of the thumb. Kinda like a trowel. And from contour, remember it will look like a dog head.
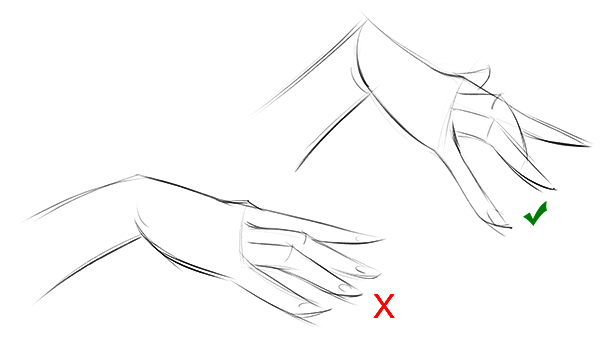
The Wrist
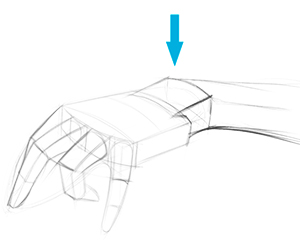
On the surface, the wrist curves to fill the gap betwixt the palm and forearm. So, a good place to start is the 2×4 grade of the forearm bones. The wrist would be a transitional aeroplane when in that location's a bend. Wait at Bridgman for inspiration when designing the wrist. Hither's a few different poses and then you tin come across how the wrist behaves. Observe how he puts a little pace down from the forearm to the mitt. Information technology's a squeamish blueprint that tin can make your cartoon more interesting and dynamic. Instead of putting the mitt and forearm on the aforementioned level, put the mitt lower than the forearm. That step gives a prissy catamenia through the wrist.
At this point we have the manus posed. From hither we just develop the forms of the muscles, and the details like skin folds, fat, veins and tendons. If yous think the process has been kind of meticulous so far, you're right. As you go comfortable with the process, you lot'll be able to skip some steps or simply throw quick indications of the forms instead of amalgam all the meticulous boxes. The matter is, to get skillful plenty to practice that, you have to practice the meticulous way first. That gets the forms ingrained in your head so that y'all can describe accurate indications of them afterwards. Drawing quickly and loosely is a skill developed by drawing slowly and advisedly. This tutorial is intended for those that are in it for the long haul. The students that are willing to put in the time now to get one of the best. I hope that's you!
Muscles
The principal muscular forms of the hands can exist split up into iii sections, which I call Papa Bear, Mama Bear, and Baby Bear.
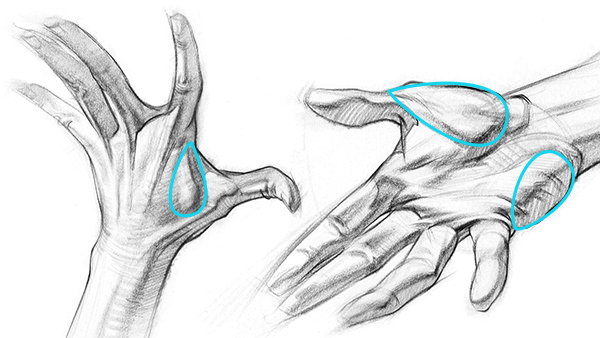
The Papa Bear on the thumb side of the palm is the biggest. I e'er recall of it as a drumstick. A thinned stretched out drumstick if the thumb is pulling away from the palm. A thick circular drumstick when the thumb is squeezing confronting the palm.
The muscles on the pinky side are likewise a teardrop, but they're generally covered with a thick layer of fat on the palm. I include the fat and draw the class as a convex box. When the pinky is flexing or abducting, the crease betwixt the fat and musculus appears. I'll show the corner of the fatty pad, and the round form of the muscle belly. If the the pinky was relaxed, I would circular out this edge.
When the thumb is squeezed in, these two forms are separated by a pucker. Otherwise, don't force a crease in in that location. Recollect, mitt butts…
So, in this pose, since the pinky is abducting away from the others, I would see a pucker here betwixt the fat and muscle.
This tutorial is covered in more than detail in the following video. Check information technology out for more on the drawing process and a detailed caption of drawing the hand.
About Proko
Proko is a resources for artists to get good art instruction videos.
https://www.proko.com/
In addition to gratis resource, it also offers premium courses designed to give artists a detailed understanding of a specific subject. Premium courses are downloadable and include extended videos, consignment demos and examples, e-books, critique videos, and 3D models.
Other Videos in this Serial
Check out the balance of the lessons in this series to learn more than nearly drawing the bones and muscles of the paw to make your mitt drawings realistic.
Assignment
Then lets do it. Your assignment is to follow this process and draw five easily from imagination. Mail them in the Beefcake Grouping . I might critique your cartoon in the next critique video.
Get the Hand Model Pack
Past the way, I merely published a new easily reference pack. These should assist you guys exercise sketching easily, written report the beefcake, and could be references for your illustrations. There's a agglomeration of dissimilar poses. Over 1500 photos total. And Marshall Vandruff is one of the main models. If you want it, grab information technology here .
Alright, go accept some fun.
Shading and Details
At this point, I similar shading in the primary forms . I pick a light direction which I experience works all-time with this pose. To watch me shade and invent all details for these hands, check out the premium anatomy grade. There's and then much to larn about human beefcake and if you're ready to dive it, check out our Beefcake Form .
Drawing from imagination is good paired with drawing from life. If you're cartoon from imagination and you're really struggling with a certain pose, take a picture of your own paw in that pose and written report information technology. When you written report from life you learn more than virtually how the manus works and how the shapes expect in diverse poses. You tin employ that knowledge to better your work from imagination.

Source: https://www.clipstudio.net/how-to-draw/archives/156141
Posted by: williamsblithad.blogspot.com
0 Response to "How To Draw Arms Coming Towards You"
Post a Comment