

How To Create Crosstab In Tableau
This tutorial walks through usin g the Python tableau-api-lib package and is part of a series on how to tap Tableau Server like a keg, giving you control over Tableau Server's REST API.
These tutorials assume you have Python 3 installed already. If you do not have Python 3 yet, this will get you started: guide to install Python.
Setting the Stage
Let's say you have a crosstab in Tableau and you need to download it for whatever reason. If you go about doing this with the Tableau REST API, you'll get the data you want… it just won't necessarily be in the format you need.
The main issue is that when you download the view data, you are not going to get data in the form of a 'pivot table' or a crosstab. You'll have a raw table in database format, where all your dimensions appear as columns.
Let's see how we can download the data and shape it back into the table or crosstab you had in mind.
Here's a quick look at the Tableau view whose data we'll download:

Step 1: make sure you have tableau-api-lib installed
Even if you're a pro at these tutorials, do yourself a favor and pull the latest version of the library.
pip install --upgrade tableau-api-lib
New to this Python stuff? Don't sweat it, you'll catch on quick. Follow this getting started tutorial. That tutorial walks you through getting connected to Tableau Server using tableau-api-lib.
Step 2: tap into your Tableau Server environment
Use the code below as a template for getting connected to your server. In future steps, we will build upon this boilerplate with one-off lines of code. At the end of the article, you'll find a consolidated block of code you can copy/paste for your convenience.
          from tableau_api_lib import TableauServerConnection
from tableau_api_lib.utils import querying          tableau_server_config = {
            'my_env': {
            'server': 'https://YourTableauServer.com',
            'api_version': '<YOUR_API_VERSION>',
            'username': '<YOUR_USERNAME>',
            'password': '<YOUR_PASSWORD>',
            'site_name': '<YOUR_SITE_NAME>',
            'site_url': '<YOUR_SITE_CONTENT_URL>'
            }
}          conn = TableauServerConnection(tableau_server_config, env='my_env')
conn.sign_in()
Fun fact: you can also use personal access tokens, assuming you are on Tableau Server 2019.4 or newer. If you're all about the access tokens, check out my article for details on how to use them.
Step 3: find the droid you're looking for
We want to query a view, so first we'll need to fetch the ID value for the desired view.
site_views_df = querying.get_views_dataframe(conn) Here's what my resulting DataFrame looks like:

If we wanted to, we could search through manually and copy/paste the relevant 'id' value. However, if you are working in a large Tableau environment then you might have many views with the same name.
For that reason, let's do this the right way and unpack the details in our 'workbook' column so we can filter on the workbook name to make sure we are really getting the droid we're looking for.
Step 4: extract workbook details so we can narrow things down
Using a handy tableau-api-lib function, we can easily unpack the workbook details. You can see how this function is imported by referencing the complete code provided at the end of the article.
          site_views_detailed_df = flatten_dict_column(
site_views_df, keys=['name', 'id'], col_name='workbook')
And now we can quickly verify that the resulting DataFrame has the workbook details unpacked:

Now we can easily filter on the workbook name we care about. In my case, the workbook is named 'query_view_as_crosstab' and the view I'm wanting to download is named 'Visual C'. To reiterate a point made earlier, we want to filter on the workbook because it's very likely that view names are not unique across our entire Tableau site but they are always unique within workbooks.
relevant_views_df = site_views_detailed_df[site_views_detailed_df['workbook_name'] == 'query_view_as_crosstab'] Step 5: query the view data
Now that we've isolated our views to the workbook we are interested in, let's get the view ID for the target view.
visual_c_id = relevant_views_df[relevant_views_df['name'] == 'Visual C']['id'].to_list()[0] Equipped with the view ID, we can now query the view data:
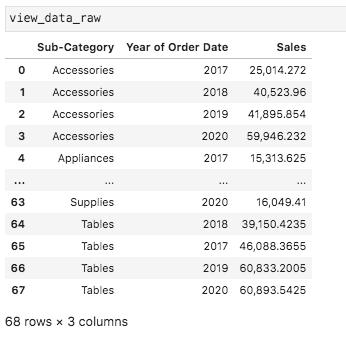
view_data_raw = querying.get_view_data_dataframe(conn, view_id=visual_c_id) The tableau-api-lib querying function 'get_view_data_dataframe()' returns a Pandas DataFrame, and mine looks like this:
It's a good start, but we need to pivot this data such that 'Sub-Category' defines our rows, 'Year of Order Date' defines our columns, and 'Sales' fills in the values of the pivoted table.
Step 6: pivot the DataFrame to produce the desired table
Before we do the final step of pivoting the table, let's quickly apply an optional improvement to the data: renaming the weirdly-named 'Year of Order Date' column to 'Year'.
view_data_raw.rename(columns={'Year of Order Date': 'Year'}, inplace=True) Ah, that's better. Now let's wrap this thing up!
view_data_raw.pivot_table(values=['Sales'], index=['Sub-Category'], columns=['Year']) Before we call it a day, let's quickly dissect this last bit of code. The Pandas DataFrame 'pivot_table()' function has provided us an easy way to redefine the structure of our data.
The 'values' parameter defines what will fill in the values of the table, while the 'index' value defines the rows and 'columns' defines… the columns!
Here's how we look now:

That's a wrap!
Consolidated code
Use this GitHub gist as a starting point for modifying the steps we have covered in this tutorial for your own use.
How To Create Crosstab In Tableau
Source: https://towardsdatascience.com/querying-tableau-view-data-as-a-crosstab-using-python-and-pandas-ca71a4be5be0
Posted by: williamsblithad.blogspot.com
0 Response to "How To Create Crosstab In Tableau"
Post a Comment